Learn to PLAY the VIOLIN
 The violin is one of the most rewarding and beautiful instruments to play. The road to learning the violin is a long one, but with patience, discipline, and enthusiasm, these steps will help you start down the road to success with this storied instrument.
1. Purchase a violin. If you're just starting out with the instrument, there's no need to spend an excessive amount of money on a violin, but like most instruments, the quality of the violin generally rises as the price goes up. Expect to spend a few hundred dollars on a decent beginner's violin.
2. Check the accessories. Your violin should come with four strings, a bow, and a hard carrying case. In most cases, the person who sells you the violin will be happy to string it for you, which has the added bonus of double-checking to be sure the tuning pegs (the black knobs at the scroll, or top, of the violin) are properly fit to the scroll. A hard case is important because violins are such delicate instruments.
3. Purchase other items. Nearly all violinists use a chin rest, which is a cheap, ergonomic piece of (usually black) plastic that clamps near the base of the violin and allows it to be held securely by your chin. Aside from that, be sure you have some rosin (coagulated sap) for your bow, a music stand, and a book of beginner lessons or songs, preferably in a format that will open flat.
Basic technique:
1. Tighten the bow. Once you've set up your music stand and sheet music, open the hard case and remove the bow. The hair of the bow should be limp. Tighten the bow hair by turning the end screw clockwise until the space between the hair and the stick is big enough to pass a pencil through cleanly from tip to tip.
2. Rosin the bow. Rosin comes in two types, dark and light; either is fine to use, and neither is expensive. It's usually a rectangle of hard, translucent material in a paper or cardboard casing that's open on two sides. Grip the rosin by the papered sides and gently but vigorously rub it up and down along the length of the bow hair three or four times. The goal is to transfer some of the rosin “dust” onto the hair, making it stickier.
3. Tune the violin. Set the bow aside for a moment and take the violin out of the case. The strings, in order from lowest tone to highest, should be tuned to G, D, A, and E. Major adjustments can be made with the tuning pegs in the scroll of the violin, but if the tone seems only a little bit off, use the tiny metal dials near the bottom, called fine tuners, to make your adjustments instead. Once you're satisfied, return the violin to the open case for a moment.
4. Grip the bow. Start by gently laying the middle part of your index finger on the grip (the slightly padded part of the stick, usually a few inches above the tightening knob). Place the tip of your pinky on the flat part of the stick near the base, keeping it slightly curved. The ring and middle fingers should rest with their middle parts in line with the tip of your pinky, and their tips on the side of the frog (the black piece that connects the tightening knob to the the hair). Your thumb should rest underneath the stick, at the front of the frog, near or on the bow hair.
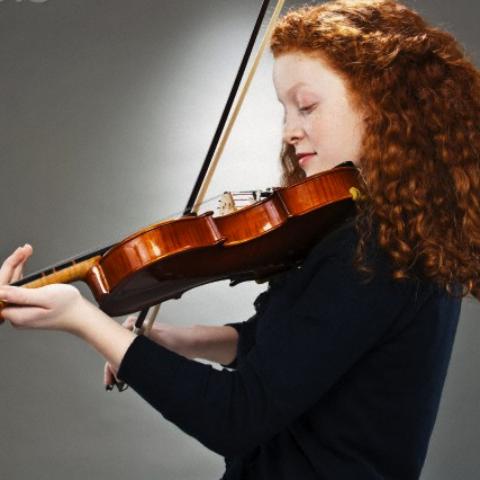
5. Hold the violin. Stand or sit with a straight back. Pick it up by its neck with your left hand and bring the butt of the instrument up to your neck. Rest the lower back of the violin on your collar bone and hold it in place with your jaw.
6. Perfect your hand position. Place your hand under the top part of the neck and support the violin so that the scroll is pointing out away from you. Hold it steady by resting the side of your thumb on the neck, and allow your four fingers to arch over the fingerboard, which is the black plate covering the front of the neck.
7. Play the strings. Place the flat side of the bow hair approximately halfway between the bridge (the flimsy-looking wooden stand 3/4 of the way down the strings that keeps them tented) and the fingerboard, so that it's directly over the belly (front body) of the violin. Pull the bow along the string as straight as you can, parallel to the bridge, applying a small amount of pressure. A sound should emanate from the violin.
8. Practice playing open strings. Open strings are simply strings played without fingertips on them. Rest the neck of the violin in the space between the left thumb and first finger. Hold the bow with your wrist, elbow, shoulder and contact point on the string within one plane. Change strings by raising or lowering the elbow to bring the bow to the proper height. Try short strokes of 6 inches or so in the middle of the bow at first, then try half strokes from the frog to the middle and back again. Work your way up to full-length strokes.
9. Practice playing other notes. It takes a lot of practice to master the pressure and positioning required to get your fingers to produce clear notes on the fingerboard. Start with your strongest finger, the pointer finger. Using the tip only, press down firmly on the highest string (the E string). You don't need to use as much pressure as you do with guitar strings; a modest but firm amount is enough. Draw the bow across the E string to produce a slightly higher note. If you are holding the violin properly, your finger should naturally come down about half an inch below the nut (the top of the fingerboard), producing an F note.
10. Practice scales. A scale is a series of notes that ascend and descend in a pattern of steps (usually 8, sometimes 5) that starts at one note and ends at a higher or lower version of the same note. An easy (and useful) scale for beginners is the D Major scale, which starts on the open D string. From there, place your fingers down in order (as described above) and play each note: D (open), E, F sharp, G (which should be produced by your third, or ring, finger). To complete the scale, play the next highest open string, A, and then repeat the pattern on the A string to play B, C sharp, and finally D with your third finger.
11. Practice every day. Start with a short time (15 or 20 minutes) and work a little longer every day until you reach an hour, or you can't find any more time to play. Serious violinists often practice for 3 or more hours per day; then again, many violinists at that level get money for playing. Practice as much as you reasonably can, and keep at it. Even sounding good enough to play a few simple songs can take months, but eventually, things will begin to come together.
Source: wikihow.com